Tuesday, January 17, 2012

How to make a Light effect on Photoshop

LightEffect20Light Effect On A Model Light is a cool subject to talk about. After reading some articles about light effect, I decided to write a tutorial showing how to create a very spectacular light effect around a model. Before that, I will show you a quick technique to retouch portrait and bring new look on it, step by step


Step 1: Open a new document, I used 800x600 pixels and look for a model photo on the internet, this is the one I used:
LightEffect1
After downloading, place it on your document. Now we will start to retouch it!
Step 2: As you can see, it is a bit dark so we should make it brighter first. Duplicate your photo by pressing Ctrl-J and change its blending mode to Screen. Simple, right?
LightEffect2
 It is now better. Merge down this layer donw by pressing Ctrl-E. After that, duplicate it again and go to Filter>Blur>Gaussian Blur and use a value of 4.5 pixels
LightEffect3
Step 3: Change the blending mode to Overlay and merge it down. The model now looks wonderful!
LightEffect4
 Step 4: Next we will add some light on her. Use the Pen tool and make some point around the dark areas of the model, don't need to be so exact
LightEffect5
 Step 5: Convert this path into a selected area, you can save this area for later use by going to Select>Save Selection
LightEffect6
Step 6: Create a new layer and go to Filter>Render>Clouds and Filter>Artistic>Plastic Wrap, just use the default values
LightEffect8
Now change its blending mode to Color Dodge. Your photo may look a bit different:
LightEffect9
Step 7: In the next steps, we will add light effect on the model. Use the Pen tool to draw some curves on her
LightEffect10
 LightEffect11
Step 8: Reset your colors by pressing D and invert them by pressing X. Choose the Brush tool and go to Window>Brushes to open the Brushes panel. Pick a small brush (about 5 pixels) with 0% hardness and tick on Shape Dynamics. Create a new layer, choose the Pen tool again, right click and choose Stroke Path. Make sure you tick on the Simulate Pressure before pressing OK
LightEffect13
A small curve, thinner at two ends appear like this:
LightEffect14
Step 9: Repeat step 8 again but this time we also tick on the Scattering checkbox (make sure you make it on a new layer)
LightEffect15
After choosing Stroke Path, we get
LightEffect16
Now we can delete the path by pressing Enter. Double click on your two new created layers to open Layer Style dialog box. Use Outer Glow as following:
LightEffect17
Use the Eraser tool to delete some light areas, the glowing light seems to surround her. After this step, we get:
LightEffect18
Step 10: Make our light effect stronger by duplicate the "glowing dots" layer. Press Ctrl-I to invert its colors
LightEffect19
Change the blending mode to Overlay. And this is the result:
LightEffect20
This technique can be used in various ways but the principle is still the same. Hope you enjoy this tutorial.

Saturday, January 7, 2012

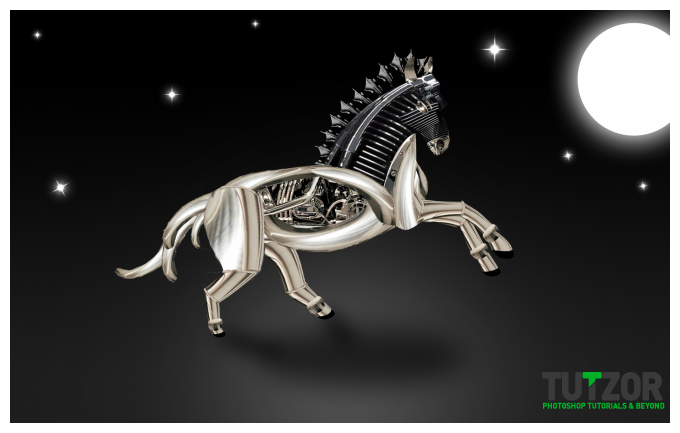
How to make a Robotic Horse in Photoshop

Final Image


Step01

First thing to do when working with an image is always to duplicate your layer. You can do this by going to the “Layer” menu at the top and going to New>Layer via Copy or by pressing the short cut. On windows it is ctrl+J.
Step02

Now you want to adjust the levels of this layer to improve the colors. I have mine at 11, 0.96 and 250.
Step03

Using the image of the bike, I am going to crop out the tire guard behind the seat using lasso tool. Once I have my selection, I am going to make it into its own layer by pressing ctrl+J. Click and drag the tire guard layer onto the horse canvas. This will put a layer of the tire guard into the layers palette. Name this layer “tire guard” by double clicking over the words that say "Layer 1". This will allow you to type in what you would like. Get used to naming your layers as this will help you signify which layer is which.
Step04

With the tire guard layer selected, choose free transform, right click and choose “flip vertical” to flip this layer upside down. Right click again and choose warp to warp the tire guard to the bottom of the horse.
Step05

Take the tire guard layer again from the bike and place it on the horse canvas and name this layer “tire guard 1”. Choose free transform and choose “flip horizontal” to pretty much match up with the top left of the horses back. Do the same thing again to this layer by warping it to fit the top of the horse.
Step06

Take the tire guard layer from the bike image again do the same method as the previous two tire guards by free transforming and warping. Name this layer “tire guard 3”. Once this is done, group the three tire guard layers by selecting them all and pressing ctrl+G. Name this group “stomach”. You should now have something that looks like this.
Step07

Now we are going to work with the legs. Use the polygonal lasso tool to crop out a section of the bike’s front shocks. While having your selection and making sure your background layer is active, press ctrl+J to duplicate the selection you just made and drag this layer onto the horse canvas. On the horse canvas, name this layer "leg". Put this layer into a group and name this folder “legs”.
Step08
 
Select your “leg” layer and copy this layer by pressing ctrl+J as we are going to use the “leg” piece repeatedly. Do not make any adjustments to layer "leg" and hide it when necessary. Using layer "leg copy", choose free transform and rotate it so that it is proportionate to the left leg and warp this layer.
Step09

After this, Copy the original layer "leg" and transform it until you have all the legs covered the way you would like it. This may be trial and error but you will get it. I believe in you. And don't worry if you have pieces that do not cover a specific area perfectly. I will show you how to hide unwanted items on an individual layer. For now just do your best to cover the legs. You may need to adjust the position of layers such as putting layers underneath certain layers just as I did with layers “leg copy” 6, 7 and 13.
Step10

Now that you have all the legs covered, I will now show you how to hide unwanted parts on a layer. If you notice my layer “leg copy 4”, I used what is called a mask. Essentially, a mask hides unwanted parts of a specified layer. Choose the layer you wish to hide a piece of and go to the Layer menu and choose layer mask>reveal all. You will notice that a white box was added next to your layer thumbnail. Select the white box and by using the paint brush and having your foreground color set to black, you will be able to hide unwanted parts of your layer. To bring back any pieces you have hidden, simply change your foreground color to white and paint over the section you would like. So basically black hides items and white reveals items that were hidden. Take note of the selection I made on the leg. This is what I revealed and everything else on this layer outside of the selection is hidden.
Step11

Once you have hidden any unwanted parts, group all leg layers that are within the “legs” folder and name this folder “legs”.
Step12
 
On my bike canvas, I am going to crop out a circle from the bike and use this for the ankles of the horse. Using the Elliptical Marquee Tool, click in the center of the circle and hold shift and alt which will cause your circle's center to be where you clicked and drag until it is proportionate to the circle and release the click. If you need to move the circle, just click inside the selection and drag it to where you would like. With your background layer selected, press ctrl+J and this will copy your selection, making it its own layer. Drag this layer to your horse canvas and name this layer “ankle” and group this layer into a folder called “ankles”.
Step13

With the ankle layer on your horse canvas, use the transform options to rotate and warp the circle. Once this step is complete, just copy this layer (ctrl+J) and use it for the other front leg and adjust accordingly.
Step14

Duplicate this layer and adjust accordingly for the other two legs. Refer to my image to see what you will need to do.I know that there are no ankles that we can see on the back legs but we will just make this up. Use the first ankle layer that you have adjusted to the front leg and transform it to the two back legs as I did.
Step15 

Next I am going to create the front hoof of the horse. Open the image "" and make a selection like I did and drag this layer to the horse canvas. Name this layer “hoof” and you will need to place this layer below the “legs” group. Group this layer, call it “hooves” and adjust the layer accordingly using the same method as before and make the two pieces, the hoof and the leg piece look good.
Step16

Once again, there are no other hooves that we can see so create the other three. Refer to my image to assist you.
Step17

Now we need to finish the legs to connect the hooves so open the “legs” group and duplicate the “leg” layer three times and use the transform, warp and mask method to make this happen. I placed my three new layers at the top of list just to put them in order.
Step18
Next I am going to add small pipes to the sections on the legs where each piece meets to make the transition flow more smoothly. Crop the pipe off the bike image and place onto the horse canvas. Name this layer “trans” and put this in a group called “transitions”.
Step19

Duplicate this layer once and place the duplicated layer accordingly. Duplicate from the original layer so that you can use it without it being changed. Place this layer accordingly making more duplicates of the original layer as necessary. Once this is complete, you can hide the original layer. Refer to my image to see how mine turned out.
Step20

Now I want to work with the snout of the horse. Open up the image "street bike" and crop out the parallel lines on the engine. Bring this layer to the horse canvas and adjust it to the horse’s snout using the method of transforming, warping and masking. Name this layer “snout”.
Step21

Next, I am going to use the highlighted red piece from the “bike” image as the tip of the snout. Put this layer on the horse canvas and place this layer below the “snout”, name this layer “mouth” and make it look similar to mine. Use the same method of free transforming, warping and masking. You will have to work with the warping a little bit but you will get it. Group these two layers and call the group “head”.
Step22
Now I want to make the nose of the horse and I will do this by taking the highlighted red piece from the “bike” image and place this on the horse canvas and name it “nose”. Free transform and warp this piece to your liking.
Step23 
Then add an inner shadow layers effect. To do this, right click on the nose layer and choose “blending options”. Click the inner shadow option and make the adjustments similar to mine. I also noticed that I have my group “head” in my “legs” group so I will drag it out of the legs group.
Step24
 
This is what we have so far. You still hanging in there ok? I know it's a lot but if you have not got it down yet, you will over time.
Step25

Now I want to add ears to our horse. On the bike image, crop out a section just below the seat and paste it on to the horse canvas, name this layer “left ear” and then place this into a group layer called “ears”. Then you will want to again use the transform and warp method as before, using a mask if needed. Take the same layer from under the seat again, name this layer “right ear” and place it on the right ear” and adjust accordingly.  
Next I want to create the neck. Use the image “bike” to crop out the neck piece and place it on the horse canvas. Once this is done, free transform, warp and mask as needed. Name this layer “neck” and place this layer under the “stomach” group and group this layer and name it “neck”.
Step27

At this point I want to give our horse an eye to see and an eyebrow to give it attitude. Crop the red highlighted pieces from the bike image and place these layers into the “head” group name these layers “eye” and “eyebrow”. How does it look?
Step28

Now we will move on to create the middle body piece. This will actually be really easy since all we have to do is crop out a big section of the bike and add it into the “stomach” group, making it the last layer. Name this layer “organs”.
Step29

We are going to take the middle of the bike and fit it perfectly inside the center of the body and then mask the unwanted parts. I want it to look like we can see the inside of the horse which will look like organs. Use a mask to hide unwanted parts.
Step30

Next I want to add something to the front neck of the horse so I will crop out a piece of metal from under the tire guard and use this as it looks to curve nicely. Place this layer in the “neck” group as the top layer and flip the layer vertically and position it similar to mine.
Step31

I want to work on the front chest of the horse so go to the bike image and crop and paste the front pipe onto the horse canvas and put this below the “neck” group and name this layer “front muscle” and group this layer with the name “chest”. Then use the transform and warp method to adjust the pipe and mask the unwanted parts (I highlighted this part red so that you can see exactly what I did).
Step32
Here, I duplicated the “tire guard 2” layer from the “stomach” group and named this layer “muscle”. I then placed this layer on top in the “chest” group and flipped it vertically. I then shrank, warped and masked the unwanted parts. I hope you are used to this by now as this tutorial favors this routine.
Step33

Now to fill in the remaining space on the chest, I am going to use the same layer “tire guard 2” and place this on top in the “legs” group and mask what I do not want. I am placing this layer here because this needs to be on top of certain layers and below others. Give this layer the name “chest”.
Step34

Lets take a look at what we have now…
Step35
Next, I want to remove the hair from the horse so that we can add out own hair. To do this, I am going to create a new layer above layer “background copy” and name it “clone”.
Step36

Choose the clone stamp tool, change your sample option in the options section at the top from “current layer” to “all layers” and take samples of sections that will replace the tail as if it were not there. To take a sample from the grass, press the alt key which will reveal a circle on your cursor and click to sample the section you want. When you have made your selection, release alt and click over the tail to start adding the grass to that section. You may need to sample sections a few times before it turns out great. (Since this layer is below all of our layers, it will not matter to go over any layers) I have provided an example of my first click.
Step37

Here I have showed you a second example of the clone stamp tool removing the entire tail.
Step38

Now let’s finish the rest of the hair. We are going to use the same method of clone stamping but this one will be a little trickier since we have different transitions from trees, to dark trees, to light grass. On the same layer “clone”, use the clone stamp tool and attempt this method again. If it does not come out right, just edit>undo and try again until you make it look as if the horse never had hair. So pretty much we want a bald horse. Never seen a bald horse but in Photoshop, you can see almost anything.
Step39

Here is a sample of my bald horse with no hair… Kind of looks like a great Dane doesn’t it! Scary…
Step40

We are almost done so hang in there. We are now going to add hair. Crop out the highlighted piece and place this on the horse canvas similar to where I placed mine. The naming of these layers does not matter. I named mine “layer 20” and put it into a group called “hair” and placed the group below the “chest” group.
Step41

Begin duplicating this layer and put about 9 to 10 layers of these evenly apart. Once this is done, select all of these layers and put them into a group called “spikes”.
Step42

Next, crop out a section like mine from the image “engine2” and place this on the horse canvas and use the method of transforming, warping and masking any unwanted parts.
Step43

Place this layer into a group called “hair” and put this group under the “spikes” group.
Step44
 
Once again, the name of these layers does not matter so just duplicate this layer as needed and adjust accordingly. Refer to my image to see what needs to be done.
Step45

Now let’s add the tail. I am going to duplicate the “tire guard 2” layer and name this “tail”, group this layer naming it “tail” and then moving this group under the “hair” group. Pretty much the tail is up to you but this is what I came up with.
Step46

Now let’s take a step back and look at our robotic horse! Awesome.
Step47
If we wanted to change the background of our horse, just find an image and place it above the “clone” layer and see how it looks. I added a layer above my "clone" layer and added a gradient to the background and a full moon and stars. I hope you enjoyed this tutorial!